
I think a common stereotype of a software engineer is a guy, usually in a hoodie, furiously pounding away at a keyboard. As if the best software engineers are those who type really fast. Or, a top-notch software engineer is someone committing 1000+ lines-of-code per day.
Maybe there is some truth to that in high-level problem domains, like web development, where it is easier to generate large volumes of code. However, in firmware and embedded systems, how much more likely is it that we're debugging a problem, spend 4-5 days studying the source code, instrumenting it for serial debug, and examining its execution, then once we find the problem, we fix it by changing just one or two lines of code?
The truth is that we probably spend more time reading code, its history, and trying to understand it and its interactions with other code, than we do writing the code. This article introduces the open-source tool OpenGrok, a tool to help with reading and navigating a codebase. To demo the application, I will document how to get it up and running on the edk2 codebase.
What is OpenGrok?
OpenGrok is a fast and usable source code search and cross reference engine, written in Java. It helps you search, cross-reference and navigate your source tree. It can understand various program file formats and version control histories of many source code management systems.
OpenGrok is a web-based application, accessed via any standard Internet browser. At its core is the Apache Lucene indexing technology. One popular configuration of OpenGrok is to put it on a server where the entire development team can share access to it. That is a great approach, but in other contexts an engineer may not have the luxury of a devops team willing to install OpenGrok, or may not have a devops team at all! For those contexts, it's perfectly acceptable to run OpenGrok on your local system, and that is what we discuss here. I'll describe what needs to be installed, how to generate the index, and how to configure the web-based application. Finally, I'll do a little demo with screenshots so the application is not so abstract.
There are many dependencies to getting OpenGrok up and running on your system. It looks scary at first, but in actuality it's not difficult with my step-by-step guide. This guide presumes you're running Windows, but the same approach can be taken for Linux.
Prerequisites
You will need to download the following components:
- SCM tools for your repositories, e.g. git, svn, etc.
- Java JDK (not the JRE)
- Download the installer, run it, accept all defaults
- Universal Ctags (for Windows)
- Download the .zip file pertaining to your CPU architecture, e.g. ctags-v6.1.0-x64.zip for AMD64-based systems
- Unzip the .zip to a directory and make note of that directory path (there is no installer)
- OpenGrok
- Download the latest .tar file, e.g. opengrok-1.13.7.tar.gz
- Unzip to a directory and make note of that directory path (there is no installer)
- Apache Tomcat (or another JSP container)
- Download the latest installer
- Run the installer, take all the defaults. It will assume you want to install the web interface on TCP port 8080 of your local system. If that's not acceptable for some reason, you can change the TCP port here:

Indexing
Once the prerequisites have been downloaded and installed, we can run the job to build the index. The index is all the symbols in your source code, with history, stored in a database. This consists of simply running one command, however, this can take a long time to complete.
I've cloned the edk2 (git clone git@github.com:tianocore/edk2.git) into this directory structure:
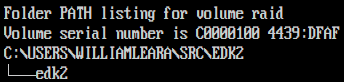
The key point is that what OpenGrok refers to as the "source directory" is, in my example, c:\users\williamleara\src\edk2. Then, inside, there is a subdirectory edk2 which is the edk2 source cloned from GitHub. This will make sense when you take a look at the following indexing command.
Here's the command to run:
java -jar lib\opengrok.jar -W C:\Users\WilliamLeara\OpenGrok\edk2_config.xml -c C:\Users\WilliamLeara\programs\ctags\ctags.exe -P -S -H -G --depth 1 -s C:\Users\WilliamLeara\src\edk2 -i d:.* -i d:Build -i *.vpw* -i *.vtg -i *.vpj -d C:\Users\WilliamLeara\OpenGrok\_edk2-data
Let's break down and explain the parameters here:
- java -jar lib\opengrok.jar — This is the executable (opengrok.jar) that does all the work. Run this command from the root of where you unzipped OpenGrok, Step #3, above
- -W C:\Users\WilliamLeara\OpenGrok\edk2_config.xml — This is the OpenGrok configuration file generated by the indexing process
- -c C:\Users\WilliamLeara\programs\ctags\ctags.exe — This is the path to ctags.exe, pointing to the directory path where you unzipped it in Step #2, above
- -P -S -H -G — These are four basic parameters that tell OpenGrok that you want to group subdirectories of the source path into projects, and index the repositories, both content and history. Refer to the help for details.
- --depth 1 — Here we're asking OpenGrok to delve no deeper that one level when looking for repositories to index
- -s C:\Users\WilliamLeara\src\edk2 — This is communicating to OpenGrok where our source code is located
- -i d:.* — Tells OpenGrok to exclude directories beginning with ".", like .git, .vscode, etc.
- -i d:Build — Tells OpenGrok to exclude indexing the edk2 Build directory
- -i *.vpw* -i *.vtg -i *.vpj — (optional) Tells OpenGrok to exclude the files created by SlickEdit, the most beloved editor of BIOS engineers ever since Brief went EOL. 😀
- -d C:\Users\WilliamLeara\OpenGrok\_edk2-data — This is where OpenGrok will store the index's database
I ran the indexing job on the edk2 source on a 3-year old (circa 2021) CPU. It took 53 minutes to complete.

Configuration
Now that the index is built, we're nearly done. There are a couple quick steps to configure the web application.
.WAR file
Apache Tomcat is what is known as a "Java Server Pages (JSP) Container". Tomcat's job is to serve up Java applications to users over a network. An explanation of this server technology is beyond the scope of this article, and anyway you don't need to know what JSP means in order to use Tomcat.
The OpenGrok UI is defined in a .WAR (Web application ARchive) file, which you can think of as a giant .zip file of Java source code files. The .war file is part of the OpenGrok distribution, and will be found in: "lib\source.war", relative to the OpenGrok root directory. Rename the source.war file to opengrok.war and copy it to the following location in your Tomcat installation:
C:\Program Files\Apache Software Foundation\Tomcat 10.1\webapps\opengrok.war
Now, use the Configure Tomcat application, which is bundled with Tomcat, to start the Tomcat service:

Upon startup, Tomcat expands all the .war files it finds in its "webapps" subdirectory to their own subdirectories and serves them up on localhost at the TCP port set during install. (default = 8080, but I selected 8888 for this example)
web.xml
Once the Tomcat service has been started, the .war file gets extracted and you will have a web.xml file located at:
C:\Program Files\Apache Software Foundation\Tomcat 10.1\webapps\opengrok\WEB-INF\web.xml
To configure OpenGrok to serve up your particular indexed content, there is just one line of XML you need to change in this file.
Just change this one, highlighted path, to the location of the edk2_config.xml file that was generated during indexing, i.e., the -W parameter, above. Restart Tomcat with the Configure Tomcat application, and hopefully you're in business!
Testing
Let's access OpenGrok at http://localhost:8888/opengrok/. We should see:


By clicking a file, we get syntax highlighted .c code. Moreover, if we click "Annotate" in the top menu bar, we get git blame-style output:


...and so on. It is quite a powerful tool, and lightning fast!
Conclusion
Naturally, there are alternatives to this approach. For example, most modern code editors have some type of syntax highlighting and code tagging facility. However, an advantage to OpenGrok is that it works at the repository level, and so is not limited to the particular branch you might have checked out. The searching and cross-referencing are lightning fast. OpenGrok can host many different repositories, of different SCMs, all at once, assigning each to its own project. Finally, OpenGrok allows you to search both the code and the code history at the same time, instead of using an editor to search the code and SCM tools for searching code history.
Hosting the indexed edk2 source on my machine is taking 490MB of RAM, and negligible CPU and I/O resources:

Some more resources to explore:
- OpenGrok home page: https://oracle.github.io/opengrok/
- OpenGrok on GitHub: https://github.com/oracle/opengrok
- OpenGrok Setup Guide: https://github.com/oracle/opengrok/wiki/How-to-setup-OpenGrok
I hope you found this article interesting. Please give OpenGrok a try!

Post a Comment
Be sure to select an account profile (e.g. Google, OpenID, etc.) before typing your comment!